DIY tutorial borsa
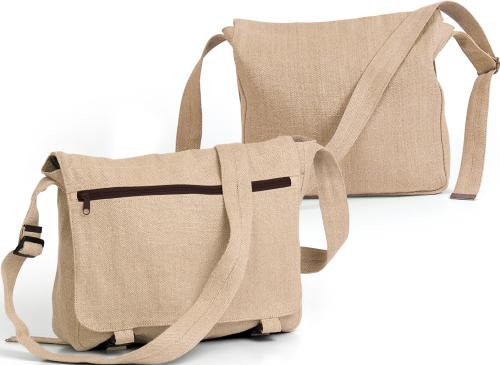
originally created for hard-working couriers, the classic Messenger Bag has been in circulation for several decades. Known for its long-lasting rugged durability and distinctive “envelope” styling, the classic Messenger has been adopted around the world as the everyday all-purpose carryall. Make a simplified version for yourself in hemp, similar to the featured tote from eco-friendly, Ecolution.
You will need:
- 1 ¼ yds. [1.2 m] of hemp or organic cotton canvas, 54″ [137 cm] wide.
- ½ yd. [0.5 m] of cotton sateen lining, 54” [137 cm] wide
- 1 ½ yds. [1.4 m] of fusible interfacing, 45″ [114 cm] wide.
- 1 closed zipper, 12” long *
- 1 buckle slider, 2” inner dia. *
- 1 belt tip hardware, 2” wide *
- matching cotton thread
- grid paper
* Match zipper to colour/metal of hardware.
BAG DIMENSIONS: approximately 4″ x 11.5″ x 14″.
[10 cm x 29.5 cm x 35.5 cm]
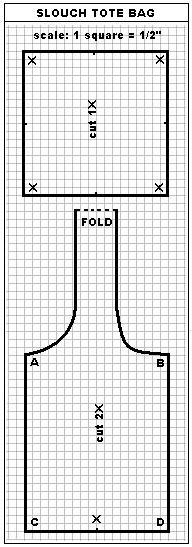
PATTERN
Scale: 1 square = 1 inch (25mm)

Add seam allowances to all pattern pieces.
CUTTING
 Bag Body – cut 1X self; cut 1X fusible
Shoulder Strap – cut 1X self
Strap Tab – cut 1X self
Flap – cut 1X self; cut 1X fusible
Flap Facing – cut 1X self; cut 1X fusible
Zipper Facing – cut 1X self; cut 1X fusible
Bag Lining – cut 2X lining
Patch Pocket – cut 1X lining
Pocket Bag – cut 2X lining
ASSEMBLY
1. Iron fusible interfacing to back (wrong side) of bag pieces following manufacturer’s directions, except for strap pieces.
2. Make up bag straps. With right sides together (RST), fold strap pieces in half lengthwise and sew along long edge. Press seam open. Align the short ends so that the seam is centered in the middle of the strap width. Stitch across one end only. Trim corners. Turn straps RIGHT SIDE OUT. Press flat with long seam at center. Topstitcharound perimeter of straps if desired. On open end, attach a metal belt tip on long strap and a buckle/slider on the short strap. Set aside.
3. Prepare bag lining. On the patch pocket, turn under the top edge ¼” [6mm] and press. Turn top edge once more: ¾” [20mm] and stitch down. Turn and press seam allowance on remaining three sides.
With one of the bag lining pieces FACE UP, center the patch pocket and edge-stitch along pocket sides and bottom.
With RST, center-align and match flap facing to top of body lining piece.
With RST, align and match remaining bag lining piece to this lining section. Stitch side seams and press open.
Stitch 2” [50mm] on each end of the bottom seam; then align the side seam to the bottom seam and sew across the seams to create a miter. Set aside.
 4. Prepare flap pocket. Begin by aligning the zipper facing with the top of the flap, right sides together. Stitch an outline of the pocket opening equal to thelength of the zipper teeth X half the zipper’s width.
(eg. 12 inches X ⅜” + seam allowance)
Carefully clip diagonally at the corners of the stitching and turn the zipper facing FACE UP. Press seam flat.
 With the flap piece FACE UP, align and center the zipper FACE UP in the indentation. Edge-stitch around pocket opening to secure the zipper.
With RST, sew one pocket bag piece to the bottom edge of the zipper facing.
Flip the lining downward and topstitch along the seam.
With flap piece FACE DOWN, align and match remaining pocket bag piece to top of zipper. Stitch zipper to lining; then stitch sides of pocket bag.
Trim the excess from the lining on the bottom of the pocket bag and sew bottom seam. Set aside.
 5. Construct the body of the bag. With RST, fold the bag body together and match up the side seams. Sew side seam and press open.
Miter the bottom corners by aligning the side seam in the center of the bottom edge and stitch across the seam. Turn bag RIGHT SIDE OUT.
With RST, align and match top of body to flap. Stitch across top edge, ensuring the catch the zipper tape in the seaming. Grade seam allowance and press seam away from zipper. On the FACE SIDE, topside along the zippered seam.
6. Assemble the bag. With RST, insert bag body into bag lining. Align and match up outer edges of flap and flap facing. Line up the raw edges of the bag  opening. Stitch around the opening and the flap. Grade and trim seam allowances. Turn bag RIGHT SIDE OUT through opening in bottom of lining. Press the perimeter of the flap and the opening edge flat. Top-stitch around flap and opening.
opening. Stitch around the opening and the flap. Grade and trim seam allowances. Turn bag RIGHT SIDE OUT through opening in bottom of lining. Press the perimeter of the flap and the opening edge flat. Top-stitch around flap and opening.
Slipstitch opening in lining closed.
7. Complete the bag. Align the square end of the straps to each side of the messenger bag. Place each approximately 4” [10 cm] from the top edge of the bag opening and sew an X-stitch through all layers. Hook the shoulder strap into the buckle slider and adjust the desired length.
UPDATE: Though this blog is closed now, I have been getting inquiries about this simple zipper application. Here are the steps:


n exercise in stylish functionality by Aussie line LIFEwithBIRD. A roomy, oversized canvas carryall, it can seamlessly go from work to after-hours party to weekend getaway, all without missing a beat. Here is a similar carpetbag version easy to draft and make up for your daytripping.
You will need:
- 1 ¾ yds. [1.5m] canvas or upholstery fabric, 54” [137 cm] wide
- 1 heavy-duty zipper, 18” [46 cm] long
- 1 ½ yds. [1.4 m] heavy webbing, 2” [50 mm] wide
- All-purpose thread
- Cardboard
- Kraft paper
DESIGN TIP: Match zipper colour with webbing strap colour.
DIMENISONS: approx. 20” X 10” X 15” (51 cm X 25.5 cm X 38 cm)
PATTERN DRAFT

Add ½” [12mm] seam allowances to all pattern pieces.
CUTTING
 Cut 2 of each piece in fabric.
Cut 2 straps from webbing – 26” long
Cut a rectangle 20” X 10” in cardboard
ASSEMBLY
1. Prepare the base. With right sides together, stitch around the perimeter of the base layers, leaving one short end opening. Turn base right side out and press. Insert cardboard into base piece and slipstitch opening closed. Set aside.
2. Prepare patch pockets. Turn under 2” [50 mm] of top edge of pocket pieces and press. Hem turned edge. Turn under pocket side seam allowances and press flat. Set aside.
NOTE: A dome snap, Velcro® tab or zipper may be added to the patch pocket opening if desired. Do so at this time following manufacturer’s directions.
3. With right sides together (RST), align and match raw edges of bag at A and B. Stitch a 1” [25 mm] seam at A and B. Press seam allowance open.
4.  Center zipper FACE down along opening in seam. Stitch zipper tape to seam allowances.
Center zipper FACE down along opening in seam. Stitch zipper tape to seam allowances.
Turn bag FACE UP and topstitch on either side of seam and zipper.
5. With RST, align and match seams between A-C and B-D. Sew seam and press. Turn bag right side out and topstitch along both sides of the seam on the FACE side.
6. On FACE side, center a patch pocket over the seam between the ● and edge-stitch along the pocket sides.
7. Attach ends of webbing strap at X at A and at B (on either side of zipper opening).
 Open zipper and turn out bag through opening. With RST, joinA to A and sew across seam, ensuring the straps are caught in the seam. (Be careful not to twist the straps.)
Repeat on opposite side for B to B.
8. Join C-D together (RST) and press seam open. On FACE side, topstitch on either side of the seam.
9. Align and match C to C and D to D. Sew seams, ensuring you catch the bottom of the patch pocket in the stitching.
10. Turn bag right side out through zipper opening. Place self-lined cardboard base into bottom of bag for support.

 Suede is a natural Aniline leather that has been surface brushed or buffed on the grain side of the leather creating a nap and leaving a texture similar to velvet (softest of all leathers to the touch). Usually suede has a natural finish, but may have a light protective coat and a transparent leather dye for colour. This process increases the leathers surface exposure making it extremely absorbent. Water drops will darken the leather but it returns to its original colour after drying.
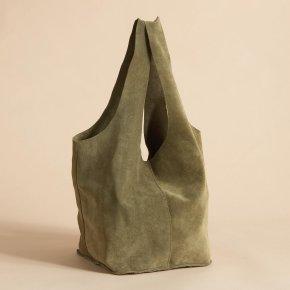
Irresistible in butter-soft suede is this chic Italian bag from Sundance. It deftly adapts to bulky or bitty loads with ease. Zen-like styling (no zips, pockets or snaps) make this easy and versatile carryall for virtually everything.
You will need:
- 1 – 4 oz. [1/16″ thick] Suede split hide, 16 square ft.
- 1 spool of cotton or nylon thread
- 1 leather machine needle
- Kraft paper
- 1 rotary cutter with pinking blade
- 1 roll of double-side mounting tape, 1/4″ wide
PATTERN
Transfer pattern onto graph paper. Each square equals 1/2 inch.
Copy onto a folded piece of kraft paper so you have the entire pattern for easy 1-ply cutting of the leather.
Dimensions: Approx. 11″H x 9-1/2″W.
CUTTING
Check skin for any tears and blemishes on the face of the suede. Chalk around them to avoid them when cutting.
Chalk out pattern on skin and cut out using pinking blade of a rotary cutter. Use a cutting mat to protect cutting surface. Cut base 1X and sides 2X. (Raw edges will not fray).
ASSEMBLY
Tape one seam [AC] with mounting tape of each side section of the tote.
On one side section, with right sides together, remove the backing on the tape and align with opposite end of section [AC] to form a bag loop. Stitch ¼” seam allowance along AC. With a bone turner, crease the seam open. Fold the seam allowance to one side and edgestitch along seam on the face through all the layer. (I use a Teflon ®presser foot to reduce drag).
Repeat the above directions for the other section.
Join each side with right sides together from B to Dwith mounting tape. Stitch ¼” seam allowance. Now you will have 2 handles.
At each X mark on the side section, snip a ¼” slit.
Tape the perimeter of the base on the wrong side with mounting tape. Place the X notch of the side sections at each corner of the base. (The slit will create a square corner). Remove backing one strip at a time and join with wrong sides together. Machine-stitch from D around the bottom, pivoting at X and continue around the base of the tote.
Commenti
Posta un commento